Wednesday, February 23, 2011

Making a move and exciting news

I am making a move.  I have been trying to update the look of my blog for awhile but haven't had much success with switching templates so....I created a new one!  I will be keeping this blog up just in case anyone wants to refer back to a past project and I hope you will all follow me at my new url Inky Expressions.


Also, the Papertrey Pals have revamped our blog and are getting ready to start a new year of fun at the beginning of March.  We will be posting something new every Monday so mark your calendars.

And for my exciting news - well, you'll just have to visit me over at Inky Expressions.  I look forward to seeing you there!

Thanks for stopping by ~
Rebecca

Saturday, February 5, 2011

Papertrey Ink Favorite Product Contest


Today is the beginning of the Papertrey Ink Anniversary Party.  The design team has posted their favorite project from the year and Nicole is having a fantastic contest you can participate in.  She has asked us to take a look at our projects from the past year and determine our favorite product.  It has been fun to look at all my creation but it was hard to pick my number one. 

After much consideration the winner is (insert drum roll please)

I love the subtle look it adds to the background of cards.  This set really is a go to for me.  Below are some examples of how I have used it.


Thanks for stopping by ~ Rebecca

Tuesday, December 28, 2010

Long time coming

Hi everyone!  Hope you all had a wonderful Holiday.  

I have been busy, busy the last month.  I thought I ordered an elf to come help me during December but he never arrived!  I have had a fabulous time preparing this year and had a Very Merry Christmas.  I am thankful to be blessed with such great family & friends.  

Like everyone else, I had shopping, wrapping & decorating to do on top of endless commitments but I did manage to craft by making cards, tasty treats & calendars for the family. 


The first picture I would like to share is a little snowman treat wrapper I found from Laurie Furnell.  I downloaded her image and used a great tutorial from Kerry's Paper Crafts for the rest.  We made these for Sophie's class party along with a card.  Her teacher had spent the week instilling the idea that this is the season of giving so to reinforce the point we donated our finished product to the nursing home to be handed out to the residents. 


For my Christmas cards I used the Papertrey Ink sets Signature Christmas, Snowfall Additions, Snowflake Serenade & Vintage Ornaments Additions.  


I tried to keep these simple to mass produce.  I added the sparkle with stickles and drew in the black outline.


I mixed up the colors between red & green.  I wasn't sure about the green on green but I like the way the red in the center makes it pop.  The ornaments were cut using Papertrey Ink Vintage Ornament Collection.


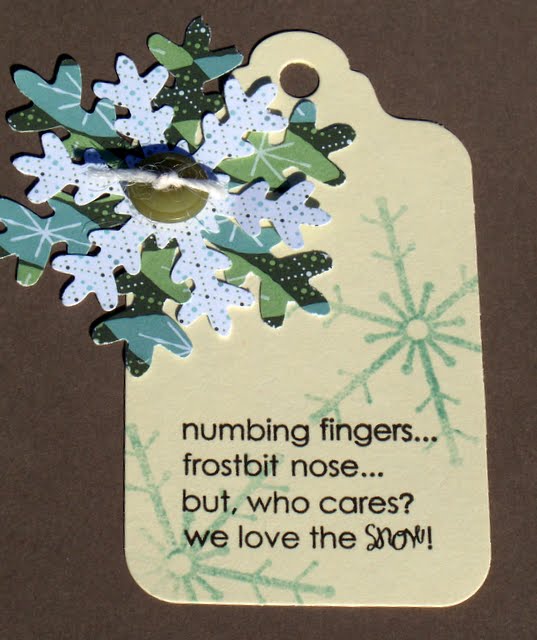
The last card was more whimsical than the first two.  The polka dot paper was punched using a Marvy Uchida Snowflake punch.  This one turned out to be my favorite. 


After all the card making was complete I moved on to treats.  We did make cookies but what I liked best were the Caramel Vanilla Rice Krispy Treats.  Some were plain and some were dipped in chocolate.  These are sooo yummy!


I followed the old rice krispy recipe substituting Jet-Puffed Caramel Vanilla Swirl Mallows.

1/4 c. melted butter
10oz. package mallows
5 c. rice krispies
melt butter, add mallows and melt on low
when melted remove from heat and stir in rice krispies quickly
spread in greased 9x13 pan

Tips:
Use greased spoon to mix.
Line pan with parchment paper to prevent sticking.
Lightly wet hands with cold water and even out mixture in the pan.  It will not stick to you with the water.


I leave you with a picture of my heart.  This was taking at Breakfast with Santa.  Notice the new earrings!  She finally found the courage to get them pierced. 

Hope you found some inspiration here.
Thanks for stopping by ~ Rebecca

Monday, November 8, 2010

Craft day - whoot!

Finally a day to spend crafting with "the girls"!  It has been way to long but life does have a way of interfering with my hobby - lol.  This weekend I spent time making some Christmas tags and it was just what the doctor ordered.


I used PTI Tag Sale 1 die to cut the shape and then stamped off SU Sage Shadow with the medium snowflake from PTI Snowfall Additions set designed by Heather Nichols whose work I adore.  The sentiment in in Versafine black from the same set. 


Snowfall Additions also coordinates with the Marvy Uchida punch which I used to make my snowflakes.  They are cut from SU designer series paper Wintergreen.  The buttons come from PTI Holiday Mix and are tied with Rustic Cream Button Twine (BTW - love this stuff! Thin enough to go through the hole and flexible enough to tie nicely).


On the back I added a sentiment from Signature Christmas and left room for "to & from".  I'll add some pretty ribbon when I box everything up.


Hope you are inspired & thanks for stopping by!

~Rebecca

Monday, October 4, 2010

Pallenge 16

First let me say that I am soooo behind on my challenge - sorry Kay!  This pallenge was to use a series of inspiration photos to guide our creativity. 


I was taken by the peacock feathers and ran with it.  This is a pocket card that has sentiment on the inside front and ...


a gift card slot on the back.


Thanks for stopping by ~ Rebecca

Friday, September 17, 2010

Another birthday card.  I told you September was a busy birthday month in our family (or maybe it was January that was a busy month :)  LOL!  For this card, I played along with Sketch Saturday week 120 challenge. 


I decided to go with a fall theme.  I chose a burnt orange color for the base and then found a stripe scrap that coordinated well. The thin strip in the middle is Core'dinations paper that was sanded to give a distressed feel.  I really like this card stock.  I think it's neat how sanding brings the back color forward.


The leaves were cut with PTI dies, stamped with Leaf Prints and then sprayed with Glimmer Mist.  I held them in place with a mini clothes pin covered with some of the Core'dination paper and topped off with a button.  I am loving those little pins.  They are so fun!


I made a double button embellishment for the bottom right.  The little one fit perfectly in the dip of the larger one and I tied them together with Rustic Cream Button Twine.


This was a fun challenge to play along with.  I don't make many square cards but this has encouraged me to try some new shapes.  Hope you all are inspired!

Thanks for stopping by ~ Rebecca

Thursday, September 16, 2010

Pallenge15 & 2 Sketches 4 You 61

September is a busy birthday month in this household so I have been forced "wink" to make a bunch of cards.  I have another one to share today.  I followed Papertrey Pals 15 for my color scheme: Plum Pudding, Melon Berry, Hawaiian Shores & Simply Chartreuse. The layout is from 2 Sketches 4 You.


I decided to make a business size card which is unusual for me but I loved the size!  I started with a Mellon Berry base versamarked with PTI Tin Types.  The next layer was a cream scrap that I sprayed with Glimmer Mist copper and then added the chartreuse ribbon.


I chose a sentiment from PTI Signature Greetings and I used their Beautiful Blooms II stamps & dies to create the flowers.  The bottom looked a little bare so I added the multi-colored yarn for some more dimension.


In the top corner I punched a little dragon fly and embellished it with a Sakura gel pen.


I know this is silly but my favorite part of the card is the bow.  I have a drawer full of ribbon that I never use because my bows don't turn out.  I found a tutorial by Dawn McVey and it was quite helpful. 

Thanks for stopping by ~ Rebecca